
The Complete TPS Club Manual
Every feature, every flow, every rule — clearly explained for club admins and managers running TPS.
TPS is a social padel platform that brings together play, community, and competition in one mobile app. Players of all levels — from total beginners to advanced club regulars — use it to book courts, find matches, connect with their club community, and compete in events. As a club admin or manager, you use TPS to create events, manage your community, set up coaches, and run tournaments.
The entire app is organised into three areas, accessible from the bottom navigation bar:
Book courts, create matches, join open matches, register results. Everything about actually playing padel.
Join groups, discover events, view rankings, chat, browse the gallery. The social side of the app.
Edit your details, check your level and reliability, review booking history, access settings and support.
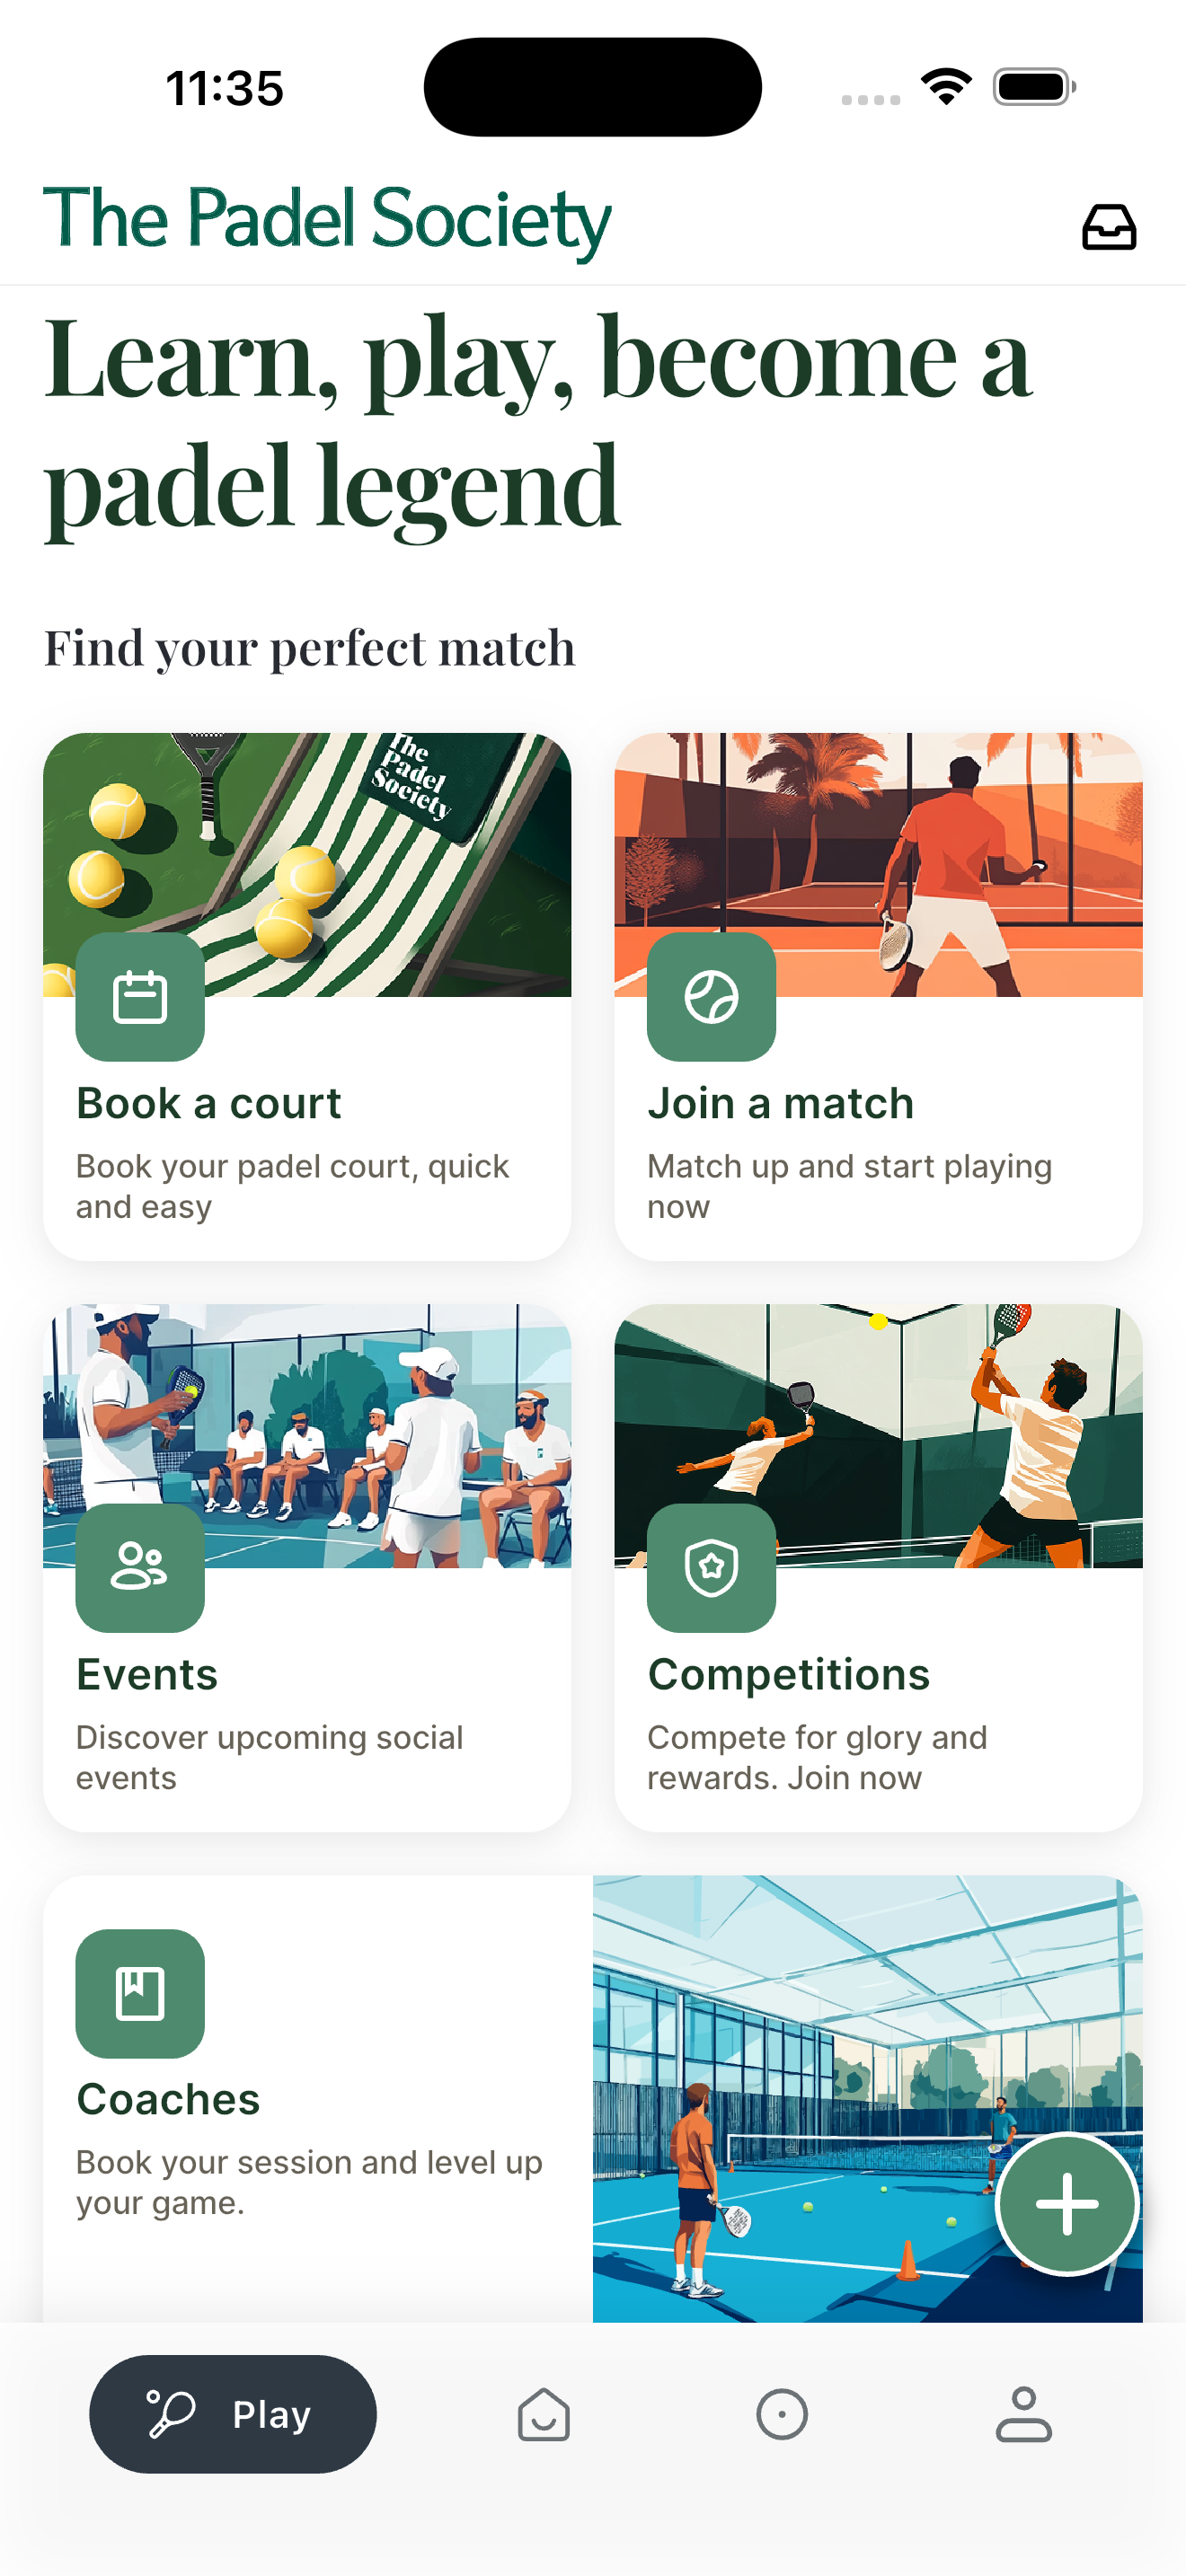
The home screen shows the tagline "Learn, play, become a padel legend" and contains six tiles — shortcuts to the main features:
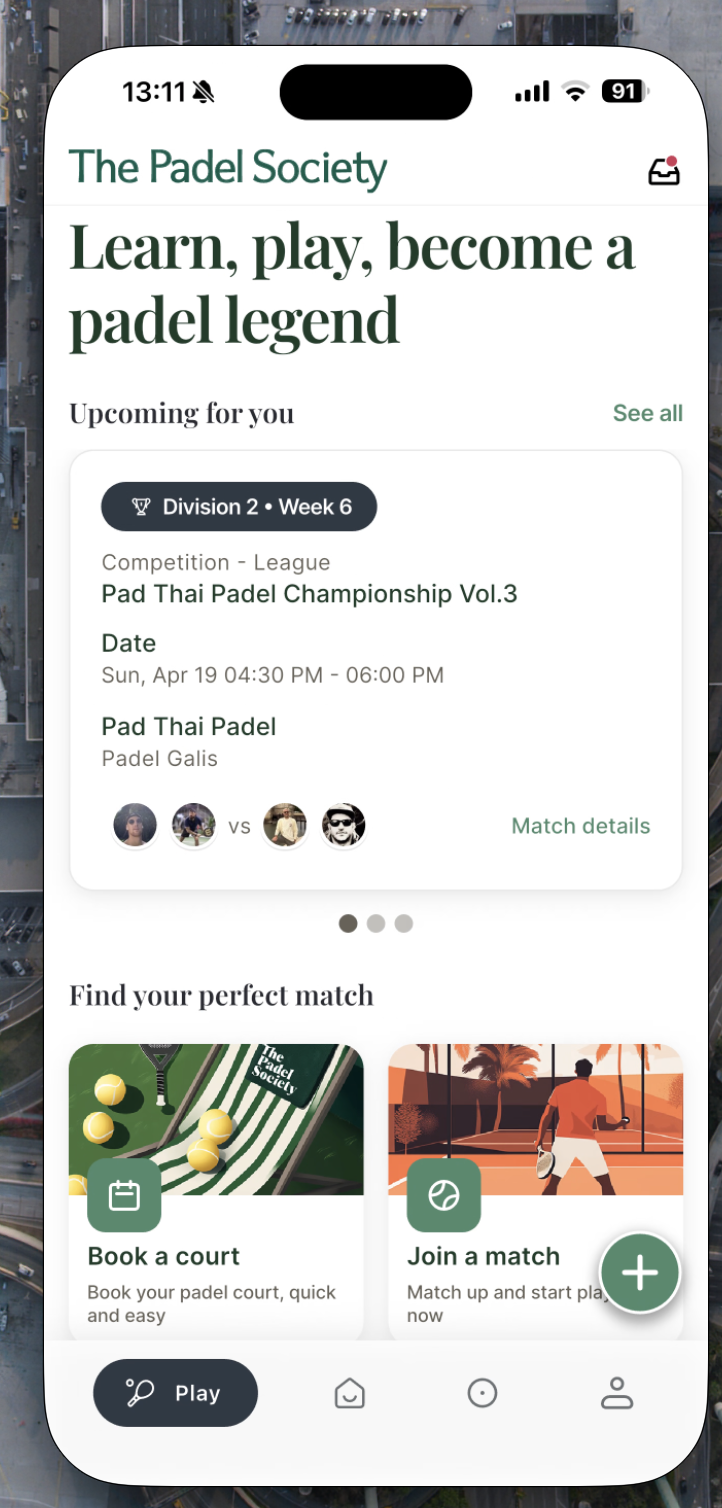
Below the tiles, the home screen shows a list of your upcoming booked matches. Tap any to open the match details.
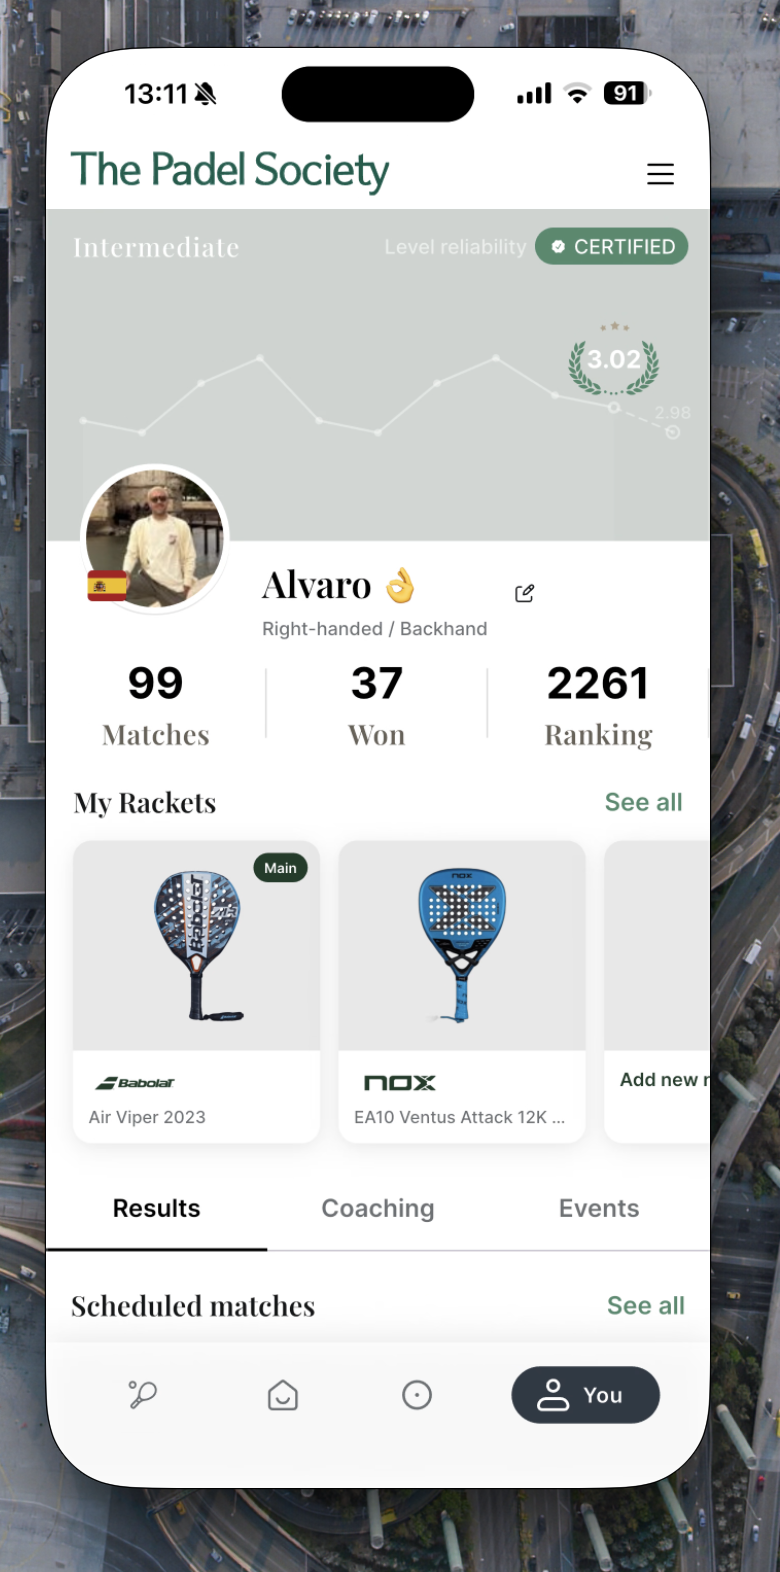
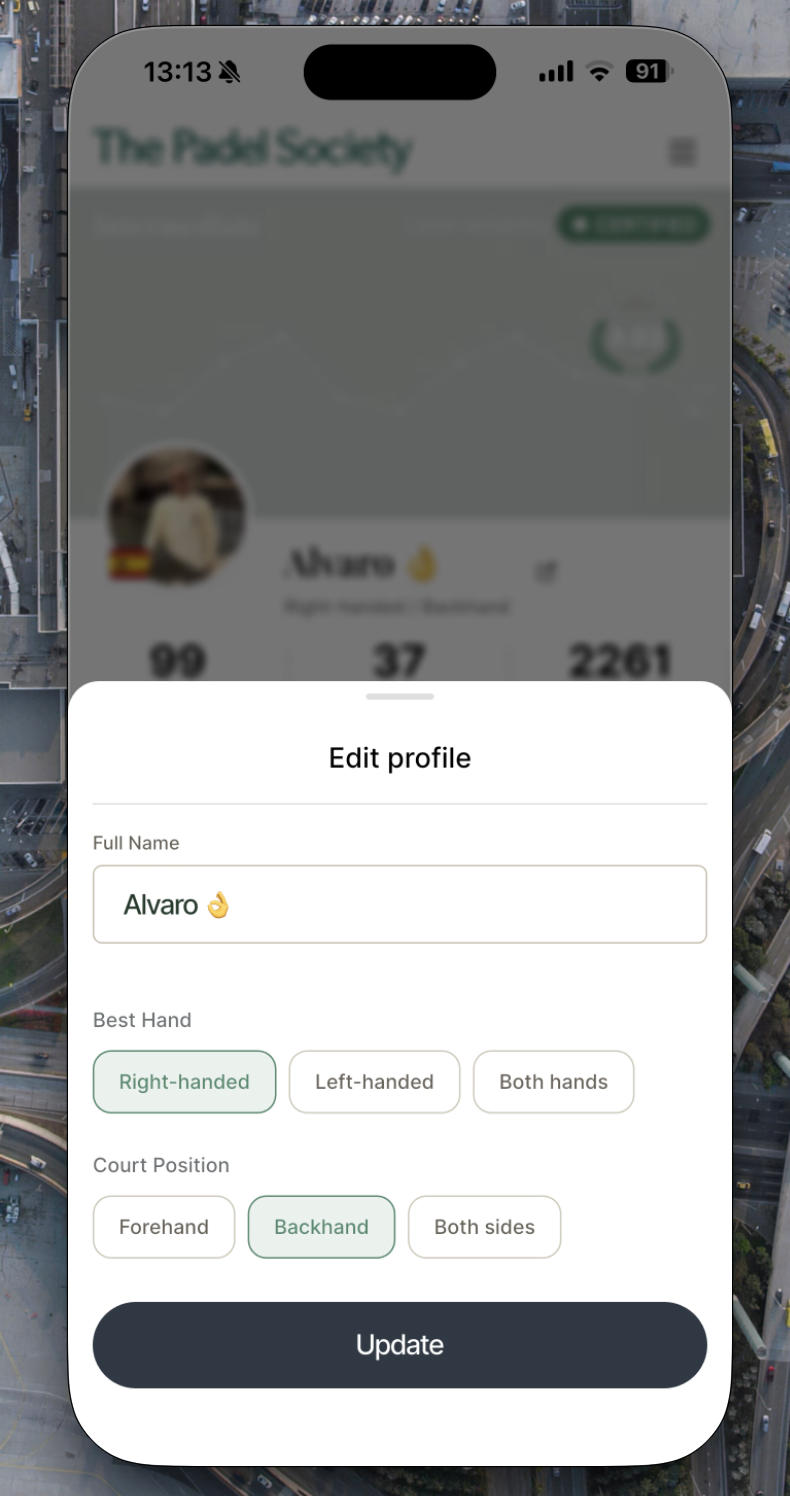
Your profile is the first thing event organisers and other players see when you appear in a match or event. A complete profile — with a photo, your playing hand, and your court position — makes it easier for others to recognise you and for organisers to balance teams correctly. Importantly, profile fields do not change your level — they provide useful context to other players.
- 1Go to the Profile tabTap the person icon in the bottom-right corner of the navigation bar.
- 2Tap "Edit Profile"The profile editing form opens with your current details pre-filled.
- 3Update your profile photoTap your avatar → choose from your camera roll or take a new photo. A clear face photo is recommended — this appears next to your name in every match, event, and leaderboard.
- 4Update your nameEnter your first and last name as you want it displayed to other players.
- 5Set your best handChoose Right or Left. This is your dominant playing hand and helps organisers understand your natural style.
- 6Set your preferred court positionChoose Forehand side (right side of the court) or Backhand side (left side). In padel the left side is typically more attacking; the right is more defensive. Organisers use this to balance pairs.
- 7Set your profile visibilityPublic — any TPS player can view your full profile. Private — only players in shared matches can see you. Public is strongly recommended for event participation.
- 8Tap SaveYour profile updates immediately across the entire app.
- →Playing level — your current TPS skill rating
- →Reliability score — how accurate and stable your level is
- →Scheduled matches — upcoming confirmed matches
- →Matches with pending scores — competitive matches awaiting result entry
- →Recent activity — a log of your recent matches and events
- 1Go to the Profile tab
- 2Tap "Booking History"A full chronological list of all past court bookings appears.
- 3Tap any booking for full detailsShows: club, court, date, time, players, payment method, and receipt link (if paid by card).
Every player has a numeric level that reflects their current playing ability. It's used throughout the app to balance teams, set event entry requirements, and ensure fair matchups. Levels are not permanent — they evolve as you play more competitive matches.
Levels run from roughly 1.0 (complete beginner) to 7.0+ (professional). Most recreational club players fall between 2.5 and 4.5.
| Level | Category | Typical Player |
|---|---|---|
| 1.0 – 2.0 | Beginner | New to padel, still learning the basics |
| 2.0 – 3.0 | Intermediate | Plays regularly, understands the game |
| 3.0 – 4.0 | Advanced Intermediate | Club event player, consistent technique |
| 4.0 – 5.0 | Advanced | Tournament player, strong technical game |
| 5.0 – 7.0+ | Elite / Pro | Semi-professional or national level |
Three things influence level progression:
- →Match participation frequency — playing regularly keeps your data fresh
- →Performance in competitive matches — winning or losing against players at different levels adjusts your rating up or down
- →Data reliability — the more competitive matches on record, the more accurately the system can calculate your level
Reliability is a separate indicator from your level. It measures how accurate and stable your level rating is.
- →High reliability → your level is a precise reflection of your real ability
- →Low reliability → your level is an estimate that needs more data to stabilise
Reliability improves when you:
- →Play more competitive matches
- →Achieve consistent results (not wildly varying wins/losses)
- →Continue playing regularly over time
Certain clubs and facilities offer official level certification sessions through TPS. In a certification session, a qualified coach assesses your level in person and validates it on the platform.
- →What it does: Confirms your level has been "validated by a club or coach" — making your level more reliable from day one, without needing many competitive matches first.
- →Where to find them: Certification sessions appear as events in the Events section of the app. Look for events with "Level Assessment" or "Certification" in the title.
- →Who should get certified: New players who want accurate matchmaking immediately, or experienced players whose self-assessed level feels off.
When creating a match or event, you can set a level range (e.g. 2.9–6.1). This acts as a filter for who can join:
| Player's Level | What Happens |
|---|---|
| Within the range | Can join immediately — no approval needed |
| Outside the range | Can tap "Request to Join" — the organiser decides whether to approve |
Accessible via the Activity tab (circle icon, bottom nav). It shows a live feed of everything relevant to you:
- →Match results — outcomes from your recent competitive matches
- →Event updates — schedule changes, score entries, new rounds
- →Community activity — new posts, announcements from communities you're in
- →Matches with pending scores — competitive matches where results haven't been entered yet
TPS sends push notifications so you never miss important updates:
- →Match reminders — before your upcoming booked matches
- →Event updates — when a round starts, scores are entered, or format changes
- →Waitlist alerts — notified immediately when a spot opens in an event you're waitlisted for
- →Join requests — when someone requests to join your match or event
- →Coaching feedback — when your coach submits feedback after a session
The Play section is your hub for all match-related activity. Access it by tapping the racket icon (Play button) in the bottom navigation bar. It gives you four actions — each serving a different need.
| Action | What it does | When to use it |
|---|---|---|
| 📅 Book a Court | Reserves court time at a club | You need a court for your group |
| ➕ Create a Match | Sets up a match and organises players | You have (or need) a court and want players to join |
| 👥 Join a Match | Finds open matches you can join | You want to play but don't have a full group |
| 📝 Register Result | Submits the score after a match | You just finished a competitive match |
- 1Tap the Play button (racket icon, bottom nav)Or tap the "Book a court" tile on the home screen.
- 2Select "Book a Court"
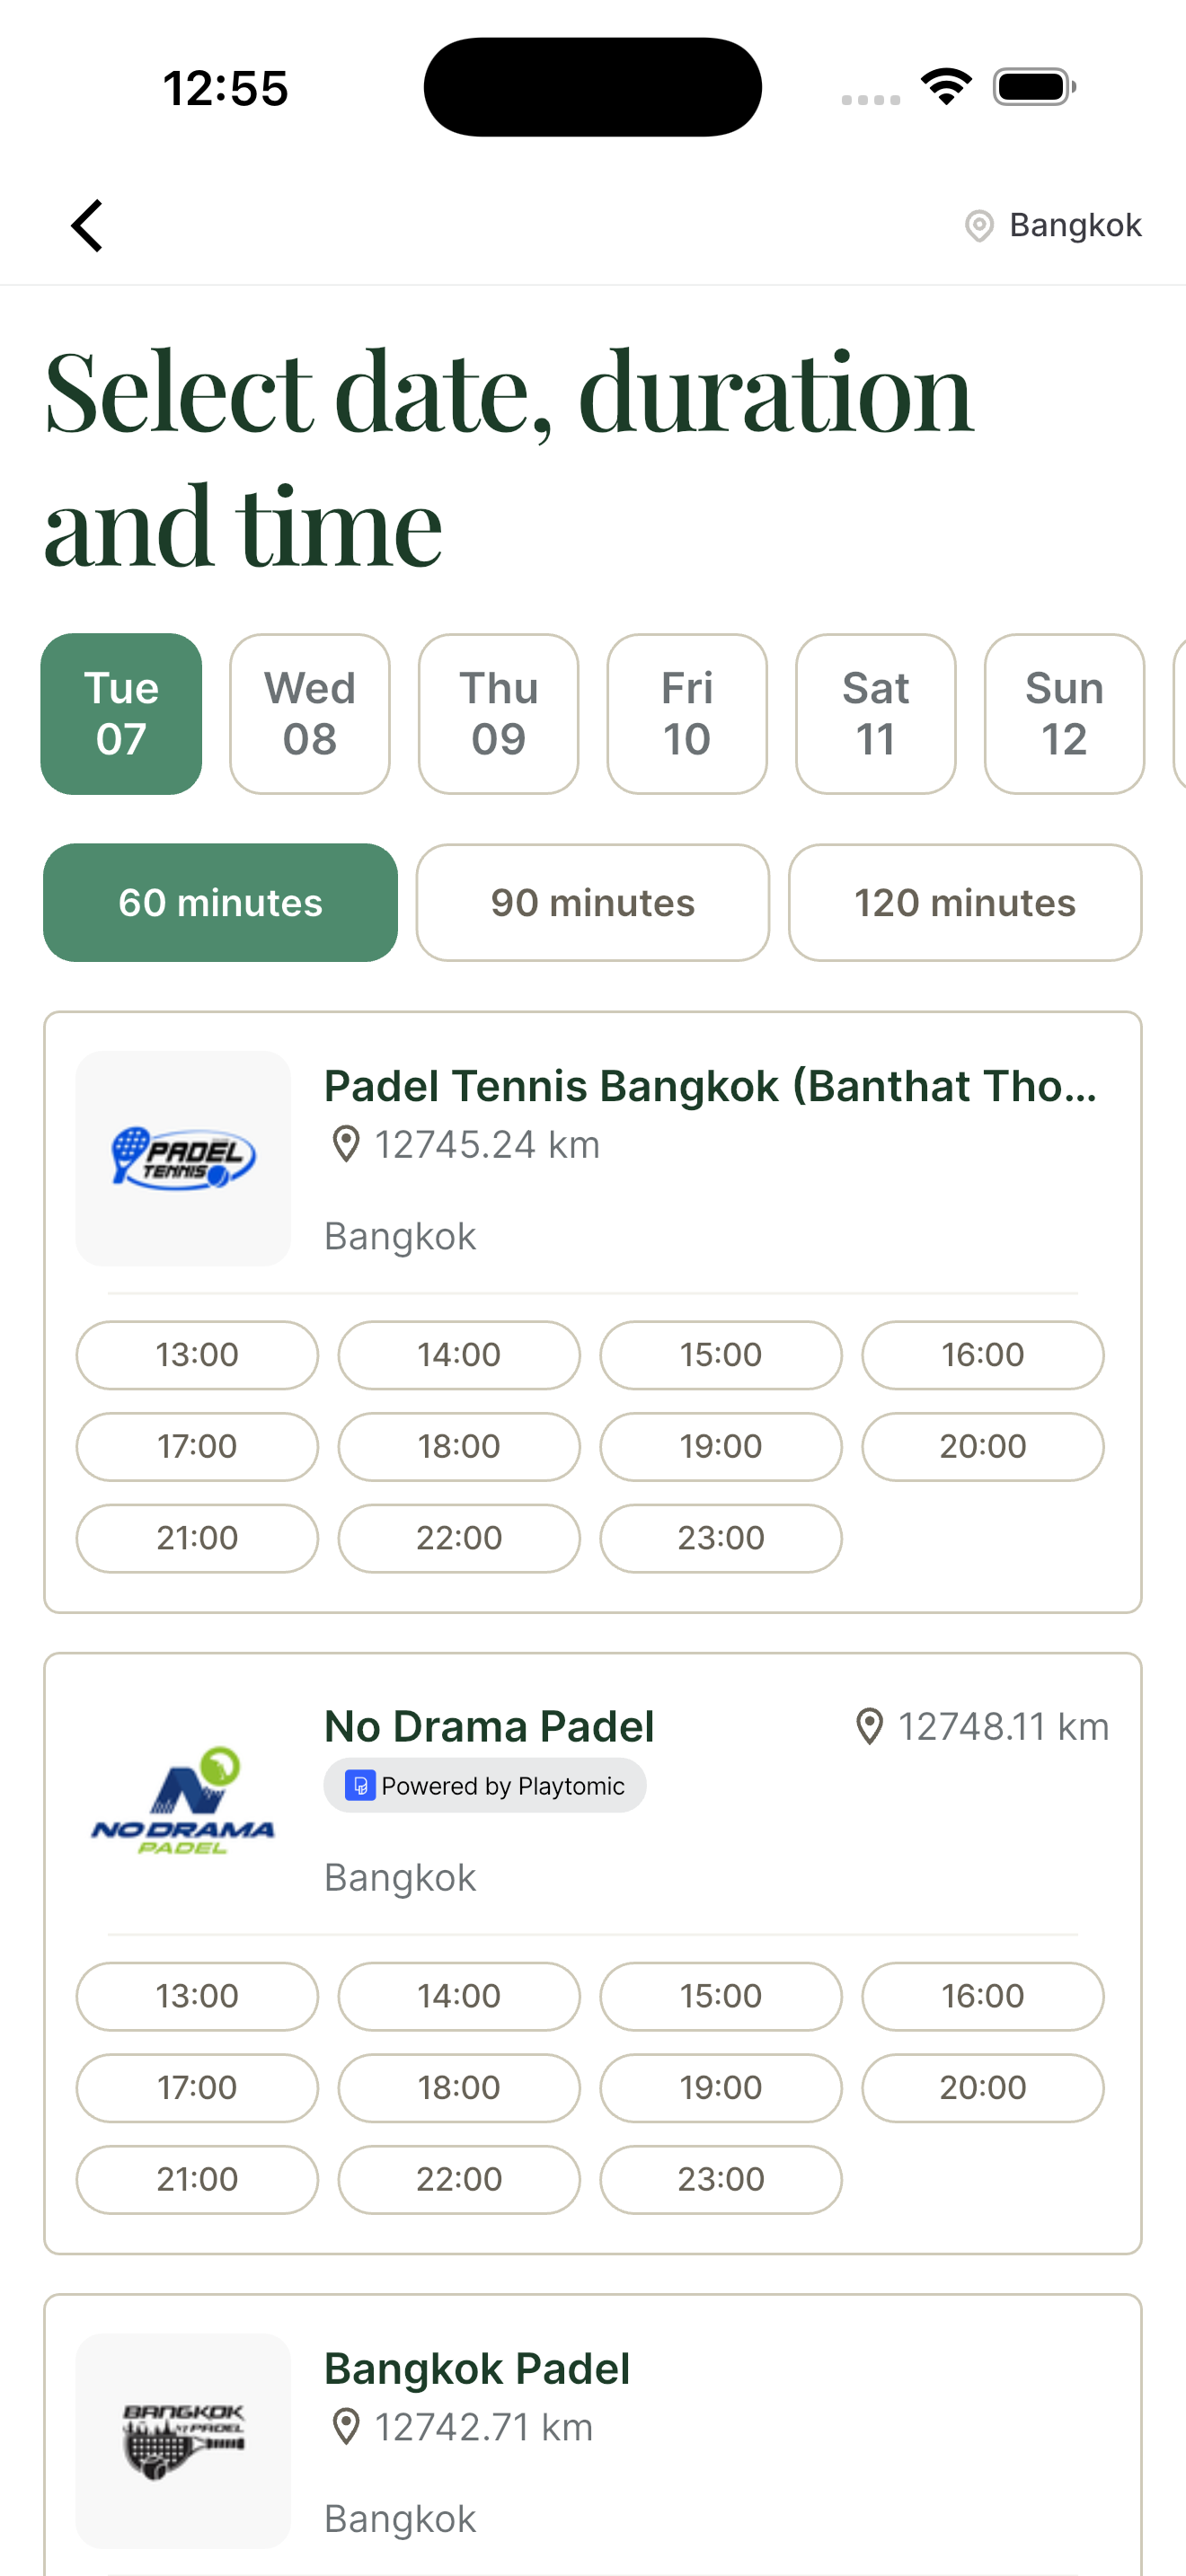
- 3Choose your clubA list of TPS partner clubs appears. You can also search by name or location. Tap your club.
- 4Pick a dateA calendar opens. The current day is highlighted. Tap your preferred date.
- 5Select a time slotAvailable slots are shown in a grid. Green = available · Grey = taken. Tap your preferred start time.
- 6Choose session durationOptions depend on the club: typically 60, 90, or 120 minutes. Duration affects the price.
- 7Choose court type (if applicable)If the club has both Indoor and Outdoor courts, select your preference.
- 8Review the cancellation policyThe club's specific cancellation terms are shown here. Read them before continuing — policies vary by club.
- 9Choose your payment methodPay at Club — pay on arrival at the club reception. Pay by Card — charge immediately in-app; receipt sent by email.
- 10Confirm the bookingA summary screen shows all your choices. Tap Confirm Booking. The court is locked in immediately and a confirmation notification is sent.
After booking, your match appears on the home screen. To invite others:
- 1Tap the match in your upcoming matches
- 2Tap "Invite friends"A unique shareable link is generated.
- 3Share via WhatsApp, iMessage, or emailFriends who tap the link land on the match page and can join a team slot directly.
| Method | When charged | Receipt |
|---|---|---|
| Pay at Club | On arrival | From club |
| Pay by Card | Immediately | Email receipt |
- 1Tap the Play button → tap the "+" → select "Create match"
- 2Select the club and time slotChoose where and when the match will take place.
- 3Choose match type: Friendly or CompetitiveThis is the most important choice. If unsure, choose Friendly.
- 4Confirm and createThe match is created. If there are open spots, it automatically becomes an Open Match — visible to other TPS players who can request to join.
| Match Type | Affects Level? | When to Use |
|---|---|---|
| Friendly | ❌ No — results never affect levels | Social play, training, mixed ability groups, when unsure |
| Competitive | ✅ Yes — after results are registered | When all players want their win/loss to count for their level |
When your match has available spots, it automatically appears as an Open Match in the Join a Match list. Other TPS players can discover it and request to join — expanding your game beyond your existing contacts.
You remain the match organiser and can approve or decline join requests from players whose level is outside your set range.
An Open Match is a match with free spots that other players can join. Open matches are perfect when you want to play but don't have a full group of four. You can find them in two places: via Play → Join a Match, or within any Community → Matches tab.
- 1Tap Play → "Join a match" (or "Join a Match" tile on the home screen)
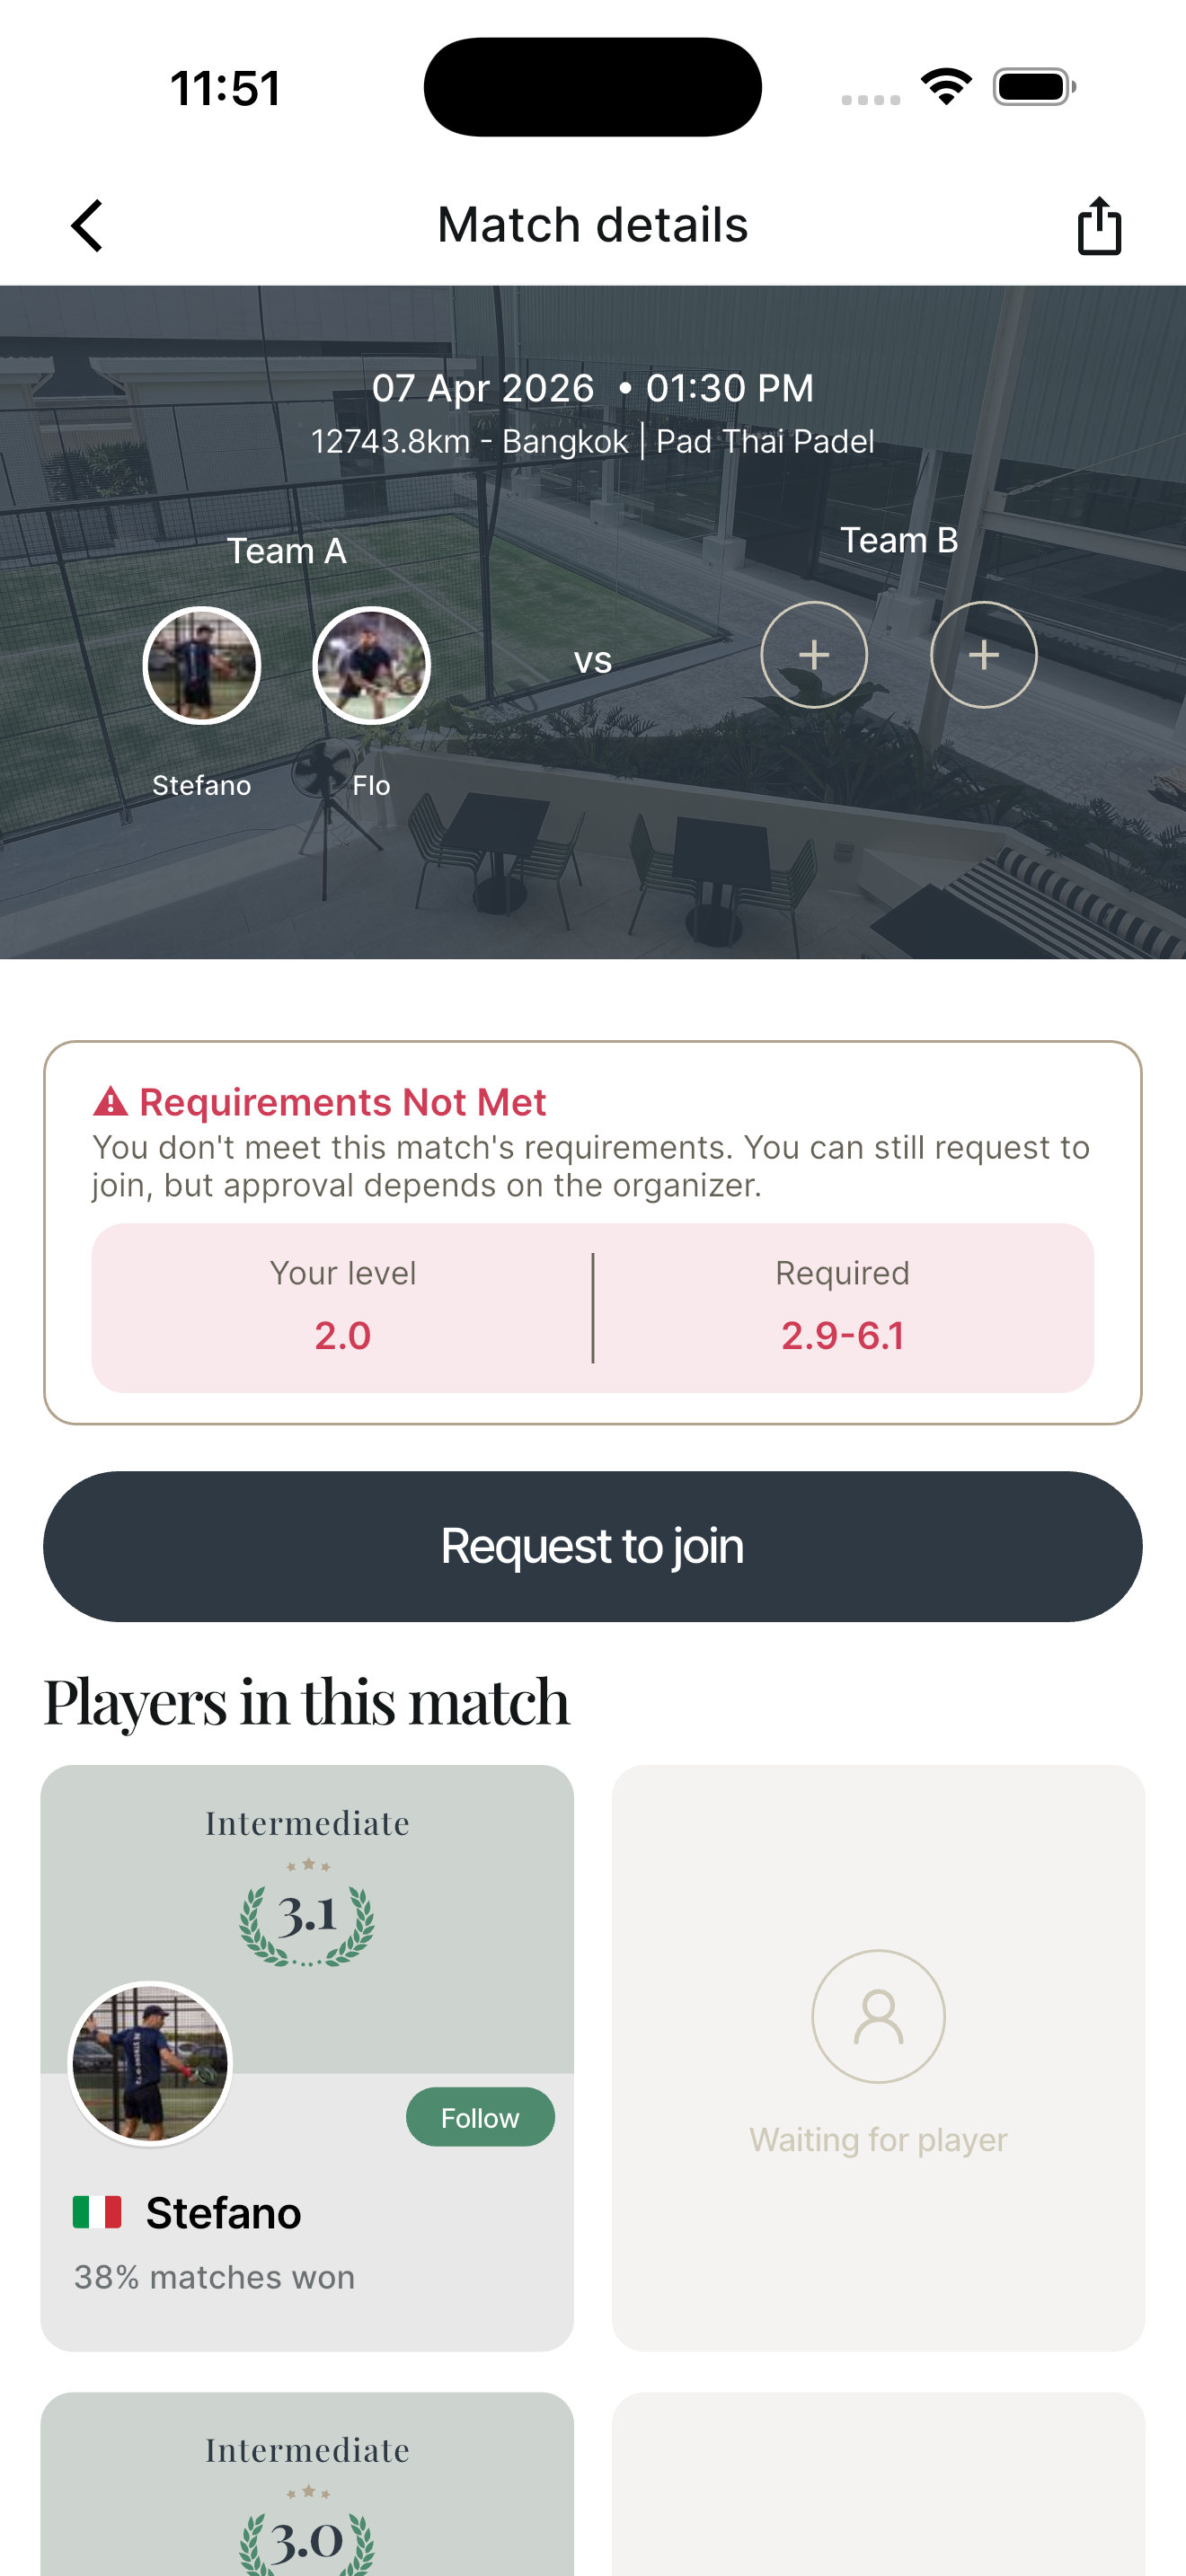
- 2Browse available matchesEach card shows: date, time, club, match type, required level range, players already joined, and open spots.
- 3Use filters to narrow resultsFilter by: Location · Club · Level range · Date · Match type (Friendly / Competitive) · Open spots
- 4Tap a match to see full detailsThe Match Details screen shows: date, time, venue, organiser, level requirement, players on each team, and open slots.
- 5Check the level requirementThe screen compares the match's required level range against your current level. If outside range, a "Requirements Not Met" notice appears — but you can still request to join.
- 6Choose a team slotMatches are 2v2. Pick Team A or Team B depending on which has an open spot.
- 7Tap "Join" or "Request to Join"Within level range: you join instantly. Outside range: a request is sent — the organiser approves or declines.
- 8Receive confirmationA push notification confirms your spot. The match appears in your home screen upcoming matches and Activity tab.
- 1Open the match from home screen or Activity tab
- 2Tap the three-dot menu (···) in the top-right
- 3Tap "Leave match" and confirmOnly available if the match is more than 24 hours away. Within 24 hours, this option is disabled.
Registering results is how scores are officially saved on TPS. For competitive matches, this is what triggers level calculations — without submitting the result, no levels change. Friendly match results can also be submitted for record-keeping purposes, but they do not affect levels.
- 1Tap the Play button → tap "+" → select "Register result"
- 2Find the matchA list of your recent matches with pending scores appears. Tap the correct match.
- 3Enter the scoreInput the final score for each team (e.g. Team A: 6 — Team B: 4).
- 4Confirm and submitTap Submit. The result is saved. For competitive matches, player levels are recalculated automatically.
- →Match Chat — a private group chat auto-created for every match. All players in that match can message. Appears inside the match detail screen.
- →Community Chat — a group chat for the entire community. Accessible from the community's Chat tab. Open to all members.
- →Direct Messages (DMs) — one-on-one conversations between any two TPS users. Start a DM from a player's profile or from the Chats tab.
- 1Open any match from your home screen or Activity tab
- 2Tap the chat bubble icon in the top-right corner
- 3Type and send your messageAll players in the match receive a notification. Use this to confirm the meeting point, coordinate arriving late, or sort out post-match plans.
A Community is a dedicated group space inside TPS. Communities are built around: clubs, social groups, skill levels, or events. Your club can have one main community for all members, and sub-communities for specific groups (e.g. "Ladies Group", "Tuesday Regulars", "Beginners"). Each community has its own feed, events, rankings, chat, and gallery.
When you open the Community tab, you see two things:
- →Your communities — groups you've already joined, listed at the top.
- →Suggested communities — recommended based on clubs you play at, events you've joined, your activity level, and your location. Each community card shows its name, photo, description, and type (club, academy, social group, etc.).
The Explore screen also highlights upcoming events from all communities — you can discover and join events even without being a community member first.
- 1Open the Community tab
- 2Search or browse communitiesUse the search bar to find a specific community by name, or scroll through suggestions.
- 3Tap the community to open its page
- 4Tap "Join Community"You immediately gain access to all tabs and can participate in events, chat, and matches.
- 1Tap the invite link shared by the adminPrivate communities don't appear in search. The only way to find them is via a direct invite link.
- 2The community page opens in the app
- 3Tap "Request to Join"A join request is sent to the community admin.
- 4Wait for admin approvalYou receive a push notification when approved. Until then, you cannot access events, chat, or other tabs.
Once inside a community, the main hub has six tabs. Together they cover everything that happens within the community:
The Rankings tab shows how members compare based on their match and event performance within this community:
- →Weekly — performance in the last 7 days. Resets each week.
- →Monthly — performance in the current calendar month.
- →All-Time — cumulative rankings since the community was created.
Rankings update automatically whenever a competitive match or event score is registered. You don't need to do anything to update them.
- 1Open your community → go to the Timeline tab
- 2Tap the "+" or Post buttonThis option is only visible to community owners and admins.
- 3Write your announcementKeep it clear and short. You can attach a photo. Examples: event reminder, schedule change, welcome message, result announcement.
- 4Tap PostAll community members receive a push notification. The post appears at the top of the timeline.
| Action | Owner / Admin | Member |
|---|---|---|
| Create events | ✅ | ❌ |
| Post timeline announcements | ✅ | ❌ |
| Share open matches to community | ✅ | ❌ |
| Organise competitions | ✅ | ❌ |
| Remove members | ✅ | ❌ |
| Promote member to admin | ✅ | ❌ |
| Edit community name, photo, description | ✅ | ❌ |
| View posts and announcements | ✅ | ✅ |
| Join events | ✅ | ✅ |
| Join open matches | ✅ | ✅ |
| See rankings | ✅ | ✅ |
| Use community chat | ✅ | ✅ |
| View gallery | ✅ | ✅ |
- 1Open the Community tab → tap "Create Community"
- 2Enter the community nameBe specific. E.g. "Jakarta Padel Club Members" or "JPC Tuesday Ladies Group".
- 3Write a descriptionBriefly explain who it's for and what members can expect.
- 4Upload a community photo or bannerUse your club logo or a padel court photo. Appears as the community header.
- 5Set visibility: Public or PrivatePublic — anyone on TPS can find and join. Private — invite-only, doesn't appear in search. Use Private for members-only groups.
- 6Link to your club (optional)Associates this community with your registered TPS club — it then appears on your club profile page.
- 7Tap "Create"Your community is live. You are automatically the owner and admin.
- 8Share the invite linkOpen the community → tap Share → copy the link → paste it in your club's WhatsApp group or email list.
- 1Open your community → tap the "+" button → select "Create event"
- 2Enter the event nameClear and descriptive. E.g. "Tuesday Americano — May" or "Monthly Mini Tournament".
- 3Set date and start time
- 4Select venue / club
- 5Set number of courtsThe app uses this to generate matchups per round. Enter only the courts you'll actually use.
- 6Choose the competition typeSelect from: No Competition, Americano, Mexicano, or Mini Tournament. See the Formats section for full details.
- 7Choose the variant (for Americano / Mexicano)Classic — individuals rotate freely. Team — fixed pairs play together throughout.
- 8Set maximum number of playersFor Americano/Mexicano, even numbers work best (8, 12, 16…). The app will show a waitlist once this limit is reached.
- 9Set points per round (for competitive formats)Standard: 21 points. Shorter: 16. Longer: 32. This is the score target that ends each round on a court.
- 10Set a level range (optional)Restrict who can join without approval. Leave wide (1.0–7.0) for social events, tighter for competitive ones.
- 11Set payment typeFree, Pay at Club, or Pay by Card. Shown to players before they confirm registration.
- 12Add a descriptionWrite any extra rules, dress code, what to bring, or notes for participants.
- 13Tap "Publish"The event is live and appears in your community's Events tab. Community members can now join.
| Status | What it means |
|---|---|
| Open | Spots available — members can join |
| Fully Booked | No spots left — members can join the waitlist |
| Completed | Event has ended — scores and results are final |
- →When an event is Fully Booked, a "Join Waitlist" button appears instead of "Join".
- →Waitlist is first come, first served.
- →If a registered player cancels, the next waitlisted player is notified immediately via push notification.
- →The notified player must confirm their spot — otherwise it passes to the next person on the list.
- 1Open the event → tap the Share icon (top-right)A unique event link is generated.
- 2Share the link to your club WhatsApp group, email list, or social mediaPlayers who tap the link land on the event registration page directly — they don't need to navigate through the app.
⚪ No Competition
- Social play only — no rounds, no winners, no leaderboard
- Designed for casual, relaxed group sessions
- Players show up, play together, no score tracking
- Best for: coaching clinics, practice sessions, social mixers where competition isn't the point
- No level data is collected from these sessions
🟢 Americano
- Players rotate partners every round — you play with and against everyone
- Points tracked individually per player across all rounds
- Leaderboard ranks individual players by total points
- Rotation is determined by the app automatically
- Best for: social mixing, large groups, players who want to meet everyone
- Variants: Classic (individual rotation) or Team (fixed pairs)
🟠 Mexicano
- Similar to Americano — but smarter rotation
- After Round 1, matchups are based on current leaderboard position
- Top-ranked players face each other; bottom players face each other
- Each round becomes more competitive as the standings emerge
- Best for: competitive groups who want intense, fair matchups
- Variants: Classic (individual) or Team (fixed pairs)
🔵 Mini Tournament
- Fixed teams play together throughout — teams don't change
- Includes both a Round Robin phase (all teams play each other) and a Knockout (KO) stage (top teams compete for the title)
- Organiser can set custom rules and advancement criteria
- Most structured and formal format
- Best for: club championships, end-of-season competitions, organised league play
| Variant | How partners work | Leaderboard tracks | Best for |
|---|---|---|---|
| Classic | Individual players rotate freely — different partner each round | Individual players | Social mixing, singles players, large groups |
| Team | Fixed pairs play together all rounds — partner never changes | Fixed pairs / teams | Couples, training partners, established duos |
| Points Setting | Approx. Time Per Round | Best for |
|---|---|---|
| 16 points | 12–15 minutes | Quick sessions, warm-ups, beginners |
| 21 points (standard) | 18–22 minutes | Standard social Americano |
| 32 points | 28–35 minutes | Competitive or premium events |
Add extra time between rounds for water breaks, score entry, and court changeovers.
Watch each format in action — recorded live on the TPS app.
- 1Open the active eventThe current round is displayed with all court matchups listed (Court 1 — Team A vs Team B, etc.).
- 2Tap a court matchupThe score entry screen opens showing Team A vs Team B for that court.
- 3Enter the final score for each sideType in the total points each team scored in that round. E.g. Team A: 21 — Team B: 15.
- 4Tap "Confirm Score"The leaderboard updates instantly. Each player's or team's running total is updated.
- 5Repeat for all courts in the roundOnce all court scores are confirmed, the app generates the next round's matchups automatically.
Shows each individual round — who played who, on which court, and the score. Use this to review past rounds or verify a score entry.
Cumulative standings — total points per player or team, current position, rounds played. Updates live after every score entry.
- 1Open the event → go to the Leaderboard tab
- 2Tap the Share buttonA link to the live leaderboard is generated. Anyone with the link can view the standings in real-time — even without a TPS account.
- 3Share to WhatsApp group, Instagram story, or whereverPost it mid-tournament for hype, and again at the end with the final results.
Before the tournament starts:
- 1Open the event → tap ··· → "Edit Event"Change the name, date, player list, courts, or points per round.
- 2Tap Save
- 1Open the event → tap ··· → "Restart Tournament"
- 2Confirm the restartYou return to the player selection screen. Set up the player list again, then start fresh.
- →All players confirmed and have a TPS account
- →Event created in the app at least the day before (not the morning of)
- →All players added to the event
- →Number of courts confirmed and set in the event
- →Points per round decided (standard: 21)
- →One designated staff member for score entry only
- →Phone charged and connected to the internet
- 1Create the event in advance (at least one day before)Go to your community → "+" → "Create event" → select Americano format → add all details. For testing, always use a future date and set the event to Private.
- 2Add all players to the eventSearch by TPS name and add each player. Do this the night before — not on the day. If a player doesn't have a TPS account, they must create one first before you can add them.
- 3Set points per round and check the timing estimateThe app shows estimated total duration based on players and courts. Share this with participants before they arrive so everyone knows how long the event runs.
- 4On the day: confirm the final player listIf someone can't make it, remove them before starting. Even numbers produce the cleanest rotations (8, 12, 16 players).
- 5Tap "Start Tournament"Round 1 matchups appear instantly. Announce each court assignment clearly: "Court 1 — Ali and Budi vs Cici and Dono. Court 2 — Eko and Fiona vs Gani and Hani." Players go to their courts.
- 6After each round: collect and enter all scoresWalk to each court, collect the score, enter it in the app. Tap Confirm for each court. Announce the leaderboard top 3 if players want to hear it. Start the next round.
- 7At the end: share and announce the final leaderboardGo to Leaderboard tab → Share → send the link to the club WhatsApp group. Announce the winner and top 3. Take a screenshot of the final standings immediately — before players leave.
- →Never add players mid-tournament — it breaks the rotation. Do it before starting.
- →One person enters scores. Multiple people editing simultaneously causes errors.
- →Announce scores out loud as you enter them — players are excited to hear updates.
- →If a player drops out mid-event: remove them and the app adjusts future rotations.
- →Take a screenshot of the final leaderboard before closing — it's your record.
- →Allow 3–5 minutes between rounds for score entry and court changeover.
| Points | Per Round |
|---|---|
| 16 | ~12–15 min |
| 21 (standard) | ~18–22 min |
| 32 | ~28–35 min |
Add ~5 min per round for score entry and changeover. A 12-player, 6-round Americano at 21pts = approximately 2.5–3 hours total.
The Coaches feature lets players book private or small group sessions with certified coaches at your club. Club admins set up coach profiles and availability via the TPS Back Office (web admin panel). Players then browse, select, and book directly in the app. All sessions are tracked and coaches can submit structured feedback after each session.
- 1Log into the TPS Admin Panel (web)Use your club admin credentials.
- 2Navigate to the Coaches section
- 3Tap "Add Coach"Fill in: name, profile photo, bio, speciality (technique, tactics, fitness, etc.), and hourly rate.
- 4Set weekly availabilityDefine which days and hours the coach is available. These appear to players as bookable slots.
- 5Save and publishThe coach profile is immediately visible in the app's Coaches section.
- 1Tap "Coaches" on the home screen
- 2Browse available coachesView each coach's photo, bio, speciality, and hourly rate.
- 3Tap a coach to view their availability calendarAvailable slots are shown. Unavailable times are greyed out.
- 4Select a date and time slot
- 5Review and pay by cardPayment charged immediately. Receipt sent by email.
- 6Receive confirmationPush notification confirms the booking. Session appears in Profile → My Coachings.
- →Player: Session appears in Profile → My Coachings. Reminder notification sent before the session.
- →Coach: Session appears in their own My Coachings list. They review upcoming and past sessions here and submit feedback after each session.
After every coaching session, the coach can submit a structured feedback report in the TPS app. The player is notified and can read the full feedback at any time. This builds a development record that both coach and player can refer back to over sessions — tracking technique improvements, tactical growth, and physical intensity over time.
- 1Tap the Profile tab → "My Coachings"
- 2Select the completed session
- 3Tap "Start Feedback"The feedback form opens.
- 4Complete all sections (see below)
- 5Tap "Submit Feedback"The player is notified immediately by push notification.
- 1Receive the notification"Your coach has submitted feedback for your session."
- 2Tap Profile → "My Coachings"
- 3Tap the session with the feedback badge
- 4Read the full feedback reportAll sections — technique, tactics, RPE, AI analysis, and notes — are displayed on one screen.
| Field | What to enter |
|---|---|
| AI Video Analysis (optional) | Upload a short video clip from the session. The AI analyses movement, footwork, and technique automatically and adds its observations to the report. |
| Technique | Free text. Describe technical aspects covered and how the player performed. E.g. "Good forehand footwork — needs to keep racket head higher on backhand volleys." |
| Tactics | Free text. Strategic observations and game reading. E.g. "Better net approach in the second half — still over-hitting defensively from the back." |
| Session Intensity (RPE 1–10) | Rate how physically hard the session was for the player. See RPE scale below. |
| Overall Notes | Any additional comments, things to practise before the next session, or personal encouragement. |
RPE = Rate of Perceived Exertion. Use this to rate how physically demanding the session was:
Rest
Light
Moderate
Hard
Max
Typical technical session: 4–6. High-intensity drills: 7–9. Light footwork or warm-up: 2–3.
Payment method is set per club and shown before you confirm any booking. Two options:
| Method | How it works | Receipt |
|---|---|---|
| Pay at Club | No payment taken in-app. Settle with the club reception on arrival. | From club directly |
| Pay by Card | Charged immediately at confirmation through the app. Supports credit and debit cards. | Sent by email automatically |
- →Refunds apply for court bookings and community events when cancelled within the club's stated cancellation window.
- →Refunds are processed automatically through the payment gateway — no manual request needed.
- →If you believe a refund is due but haven't received it, contact TPS support through the Profile tab → Support.
- →Final refund decisions always rest with the club — TPS facilitates but does not override club policy.
The Padel Society follows the cancellation and no-show policies defined by each individual club. TPS does not set universal cancellation rules — each club decides their own terms.
- →Cancellation terms are shown to players before they confirm a booking. Always read them.
- →Policies may include: specific cancellation deadlines, partial charges for late cancellations, or full charges with no refund after a deadline.
- →The final decision on charges and refunds always belongs to the club — TPS can facilitate communication but cannot override the club.
A no-show is when a player fails to attend a booking without cancelling first.
- →Clubs may charge the full booking amount for no-shows.
- →Some clubs send direct reimbursement requests for unpaid no-shows.
- →Review the cancellation deadline before confirming any booking.
- →Cancel promptly if you know you can't attend — don't wait until the last minute.
- →Contact the club directly if circumstances are exceptional — clubs often have discretion for genuine emergencies.
- →Contact TPS Support (Profile → Support) if you have a dispute you can't resolve with the club.